ASTM D2983 standard test method for low-temperature viscosity of lubricants measured by Brookfield Viscometer
8. Procedure
8.1 Preparation of the Bath:
8.1.1 Set the test temperature of the cold cabinet, monitor the temperature with a blank sample, and allow the bath to stabilize at the desired test temperature. Do not put any test samples in the turntable.
8.1.2 After equilibration, check the bath temperature by the thermometer or thermometric device immersed in a blank sample of oil held by the rotating rack.
NOTE 4 - If a temperature adjustment is made, it may require at least 1 h for temperature equilibration. Depending on specific bath characteristics, longer times for equilibration may be required after major temperature changes. Do not adjust bath temperature after 4 h into the sample-conditioning period because the apparent viscosity of the sample may be significantly changed.
8.2 Preparation of Sample:
8.2.1 Shake the sample container thoroughly and place about 30 mL into the test cell. It is essential that the appropriate reference fluids be run at the beginning and end of each test series (and results recorded) to indicate the sample temperature change that results from frequent opening of the cold cabinet. Reference fluids do not require pre-conditioning; however, they should be handled in the same manner as the test fluids in all other ways. Annex A4 details the calculation of the apparent run temperature from reference fluid viscosity and rpm data. The change in apparent run temperature (from run to run) may not exceed 0.4°C. The apparent run temperature itself should be within more or less 0.3°C of the set test temperature.
NOTE 5 - If the apparent viscosity of the sample is unknown, use two samples, one for determination of the rpm and one for determination of apparent viscosity.
8.2.2 Cover each sample (such as with aluminum foil). Maintain the sample at 50 more or less 3°C for 30 more or less 5 minutes. If using a liquid bath, then cover each sample with an airtight seal (such as a finger cot).
NOTE 6 - This preheating step has been proven important in other critical low-temperature ASTM methods and is designed to remove any memory effects that may develop from previous low-temperature exposures or structure formations. Higher temperatures and longer preheating times are being explored.
8.3 Remove the test cells from the heating source and allow to cool to room temperature (25 more or less 5°C) and then remove the covers.
8.3.1 Cover the test cell (6.4) with the cell stopper (6.5) and use the spindle clip (6.3) to support the spindle (6.2) and lower into the test cell so that the center of the spindle immersion mark is slightly below the liquid surface (to allow sample shrinkage due to cooling). This reduces the amount of disturbance placed on the sample before measurement later in the method. See Fig. 1 for diagram.
NOTE 7 - Handle and store the spindles and instrument with care at all times. Check the calibration of each spindle periodically with reference oil (see Section 7). Do not use any damaged or noticeably bent spindles.
8.4 Put the test cells and insulated test cell carriers into the cold cabinet. So as not to restrict airflow within the air chamber, do not put too many cell carriers into the air chamber. This can be checked by contacting the cold cabinet manufacturer.
8.5 Once the last cell has been loaded, let the sample soak for no less than 16 h. Experience has shown that 6 h is a sufficient soak time for automatic transmission fluids at -17.8°C. Since this shorter soak time speeds data production and is used in some automatic transmission fluids specifications, it is the only exception to the 16-h soak time allowed by this test method (see 8.10).
8.6 During the soak period, align the viscometer by using the bubble level located on the viscometer.
8.6.1 After turning on the power, zero the viscometer with no spindle attached (some digital models have an auto-zeroing feature).
8.6.2 For digital viscometers select the S64 spindle selection or the setting that corresponds to the No. 4 or No. 4B2 spindles. After selecting the S64 spindle, immediately press the spindle selection key again to store the change. Failure to press the spindle selection key within 2 s will cause the viscometer to retain the last spindle used and therefore may lead to the use of the wrong spindle selection.
NOTE 8 - Refer to the viscometer manufacturer for more detailed instructions on viscometer care and calibration.
8.7 After the 16-h soak is complete, individually transfer and test the samples as follows (It is essential that the procedure be followed in detail for the proper operation of this test):
8.7.1 Check the level of the viscometer.
NOTE 9 - It is very important that the viscometer be level during measurement.
8.7.2 Record the temperature of the blank sample.
8.7.3 Turn the turntable rotation and the air blower off.
8.7.4 Allow the air blower and the turntable to come to a complete stop then open the cold cabinet and put one temperature-conditioned test cell into a temperature-conditioned insulated cell carrier and remove from the cold cabinet.
NOTE 10 - If the laboratory is equipped with a low-temperature liquid bath capable of maintaining test temperature within more or less 0.1°C and on which the Brookfield viscometer can be conveniently mounted, a cell may be removed from the cold cabinet after 15.5 h and placed in the liquid bath at test temperature for 30 min. The apparent viscosity can then be measured directly on the sample in the cell in the liquid bath without haste and without fear that the sample will warm up as it does in the cell carrier. An insulated spindle is needed if this procedure is used.
8.7.5 Close the cold cabinet lid, immediately restart the turntable and air blower and transfer the insulated cell carrier with the sample to the viscometer.
8.7.6 Place the test cell carrier with test cell below the viscometer and align the spindle nut with the viscometer coupling nut, attach the spindle, and remove the spindle clip being sure to minimize the disturbance of the sample with the spindle.
8.7.7 Select the viscometer display mode to read either as percent of scale or directly as mPa•s.
8.7.8 Look through the windows on the test cell carrier and adjust the assembly until the oil level is even with the immersion mark on the spindle shaft. In order to facilitate the adjustment of the spindle, place a cool light source, such as a flashlight, behind one window of the test cell carrier. Great care must be taken to ensure proper spindle immersion with all samples. Maintenance of proper immersion depth is essential to good reproducibility and repeatability.
NOTE 11 - Data show that an immersion variation of as little as 1.2 mm from the immersion mark can produce viscosity errors.
8.7.9 Center the spindle in the hole at the top of the cell stopper, making certain that no part of the spindle touches the stopper hole during the measurement process.
8.8 Turn on the viscometer motor and take readings from the digital viscometer as follows:
8.8.1 Refer to Section 9 for the proper rpm setting. Use the highest viscosity reading after the first 5 s of rotation.
8.8.2 Record viscosity reading (mPa•s), spindle speed (rpm), and test temperature (°C).
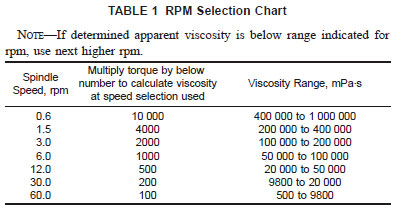
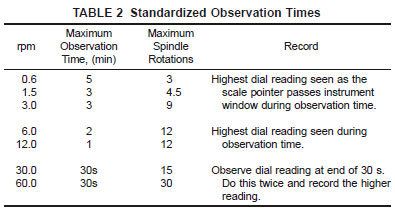
8.9 For the best precision results, testing should be started within 30 s after the sample is removed from the cold cabinet. The measurement shall be complete in no longer than 60 s (or 90 s for samples with viscosities higher than 150 000 mPa•s). Take two readings and record the higher of the two (see Table 1 for speed/viscosity selections). If using a digital viscometer, monitor the reading during the entire measurement and record the highest value. The urgency in this measurement is required to minimize sample temperature increase and erroneously low viscosities. If using an analog dial viscometer, see Table 2 for test times.


8.10 The total test series must be completed within 2 h so that the maximum soak time of 18 h is not exceeded.
8.11 After using the first cell carrier, return it to the bath for reconditioning and use the others in turn if necessary for further testing.
NOTE 12 - Frequent opening of the cold box during a long series of runs may cause a temperature rise in the test samples. It is essential to turn the air circulation device off and allow it to come to a complete stop before opening the top. Do not leave the top open unnecessarily. The test series should be run as quickly as possible.
8.12 Upon completion of testing, empty the cells and clean all parts with a suitable hydrocarbon solvent making sure all parts are clean and free of oil.