ASTM D1321 standard test method for needle penetration of petroleum waxes
6. Apparatus
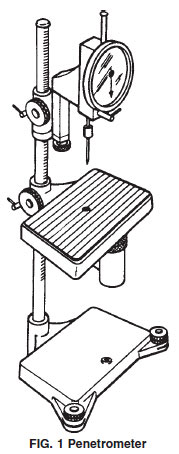
6.1 Penetrometer, for applying the standard needle to the surface of the sample specimen and for measuring the extent of penetration at the conclusion of the test. The penetrometer shall be constructed in such a manner that the accurate placement of the tip of the needle at the level surface of the specimen may be made while maintaining a "zero" reading on the indicator. The apparatus shown in Fig. 1 represents a composite drawing illustrating the two available types of instrument, one with an adjustable table and the other with an adjustable needle assembly; the use of either type of instrument is permissible. The loaded needle must fall, when released, without appreciable friction. The instrument shall be provided with leveling screws and a spirit level to maintain the plunger shaft in a true vertical position. The indicator scale shall be calibrated in tenths of a millimetre division and shall have a range of at least 250 tenths of millimetres.

6.2 Timing Device - An automatic timing release mechanism attached to the penetrometer may be used. Alternatively, a stop watch graduated in 0.1-s intervals may be used.
6.3 Needle and Plunger - The needle shall be approximately 83 mm in length and conform to the dimensions shown in Fig. 2. It shall be symmetrically tapered at one end to a cone whose angle shall be within the range from 8°, 55 min to 9°, 25 min over the entire length of the cone. The axis of the cone shall be coincident with the shaft axis within 0.13-mm (0.005-in.) maximum runout (total indicator reading). The tapered section of the needle shall be made from fully hardened and tempered stainless steel, Grade 440-C or equal, Rockwell hardness C57 to 60. After tapering, the point shall be ground off to a truncated cone, the smaller base of which shall be from 0.14 to 0.16 mm in diameter. The truncation shall be square with the needle axis within 2°, and the edge shall be sharp and free from burrs. The conical surface and the truncation shall be finished to a smoothness of 0.2 µm (8 µin.) (rms). The final weight of the needle shall be 2.5 more or less 0.05 g. The total weight of the plunger shall be 47.5 more or less 0.05 g; a weight of 50 more or less 0.05 g is required for mounting on the plunger.

NOTE 2 - The National Institute of Standards and Technology will measure and certify the accuracy of penetration needles in accordance with these permissible variations.
6.4 Test Specimen Container, consisting of a brass cylinder open at both ends, having a 25.4 more or less 1.6-mm (1 more or less 1/16-in.) inside diameter, 31.8 more or less 1.6-mm (1 1/4 more or less 1/16-in.) height, and 3.2 more or less 1.6-mm (1/8 more or less 1/16-in.) wall thickness. To prevent slippage of very hard wax, a few screw threads or grooves shall be cut into the center part of the inside wall of the cylinder. The cylinder shall be placed on a base plate of brass, wetted with an equal volume mixture of glycerin and water, when casting a test specimen.
6.5 Test Room or Cabinet, capable of being maintained at 23.9 more or less 2.2°C (75 more or less 4°F).
6.6 Water Bath, of at least 10-L capacity, capable of being maintained at the test temperature within more or less0.1°C (more or less 0.2°F) (Note 4). The water bath should be made of glass or other suitable transparent material, or have a window to permit a horizontal view of the specimen. It shall be possible to immerse the test specimen in the bath to a depth of not less than 102 mm (4 in.) and to support it on a perforated conditioning shelf not less than 51 mm (2 in.) from the bottom of the bath. The bath also shall be equipped with a rigid perforated test shelf about 51 mm below the water level to support the specimen during the penetration by the needle.
6.7 Thermometer, for use in the water bath. An ASTM Precision Thermometer, total immersion, having a range from 25 to 55°C or 77 to 131°F and conforming to the requirements for Thermometer 64C or 64F as prescribed in Specification E 1.
6.8 Brass Plate, 63.5 more or less 1.6 mm by 38 more or less 1.6 mm by 6.4 more or less 1.6 mm (2 1/2 more or less 1/16 in. by 1 1/2 more or less 1/16 in. by 1/4 more or less 1/16 in.) for supporting test specimen during preparation of the sample. The specimen support is placed on an insulating material, such as corks or rubber stoppers during the cooling period.
7. Preparation of Test Specimen
7.1 Heat the wax sample to at least 17°C (30°F) above its expected congealing point or melting point (as determined by Test Method D938 or Test Method D 87, respectively), using care to prevent local overheating. Make sure the sample is homogeneous and free from air bubbles. In the test room or cabinet maintained at 23.9 more or less 2.2°C (75 more or less 4°F), place the brass plate on a stable support, such as stoppers or corks, and wet the upper surface of the plate with a mixture of equal volumes of glycerin and water. Place the test specimen container on the plate and then pour the melted wax into it in such a way that a convex meniscus is formed. Allow the container and contents to cool in the room at 23.9 more or less 2.2°C for 1 h. Then shave any excess wax from the top of the container and remove the brass plate. Place the smooth wax surface up. Condition the specimen in the bath at the test temperature within 0.1°C (0.2°F) for 1 h.
NOTE 3 - Very hard waxes occasionally will shrink away from the walls of the test specimen container; in such cases, it is permissible to wedge the specimen in the container.


